Jan 23, 2018
Single Sign On (or SSO) is a fantastic option if you have the time and energy to implement it. SSO allows your staff member to log in once and then access all your school based and web based applications without being prompted to login again.
Configuration
Firstly it is important to understand the configuration process for SSO. There should be an IDP (provides the authentication of the staff member) and the SP (Service Provider) that is our Sobs website.
You should have some configuration information from your IDP ready to configure Sobs for your SSO to work. There are at least 4 values required and then a number of optional values you can specify as required.
IMPORTANT: Also, before you go logging out to test the login process ensure you configure a non-SAML login. This is step 9 below.
IMPORTANT: If you are configuring SAML with your own ADFS server, then download this PDF with instructions from our friends at Brigidine College – St Ives. Click to download
IMPORTANT: The SAML interface relies on the URL https://sobs.com.au Do not use https://www.sobs.com.au
IMPORTANT: When using ADFS be sure to set SHA256
IMPORTANT: October 2018 we updated our SimpleSAMLphp library to the latest version. There have been a number of changes / improvements with this update. If you find something that doesn’t work quite how you expect please do get in touch – we will do our best to help.
IMPORTANT: We now have two methods of implementing a SAML connection. 1. SHARED SAML: If you are part of group of schools who are implementing a single SAML based authentication service then the SAML settings will be shared between you and several other schools. We will need to talk to your IT department in regard to configuring this shared SAML setup, and allocate them an account from which they will be able to manage the shared SAML configuration. 2. SINGLE SCHOOL SAML: Your school has their own SAML based authentication service, it is not shared by any other schools, then the instructions below should be sufficient. Do call if you would like to discuss this.
- Start by logging into Sobs and click on ‘School Settings’ in the Configuration menu
- Click the ‘Authentication’ tab
- Part way down the page you will find a ‘SAML’ entry with an ‘Enable’ button next to it, click the ‘Enable’ button:

- When you enable SAML the system will begin prompting for values – the first value required is the BaseDomain:
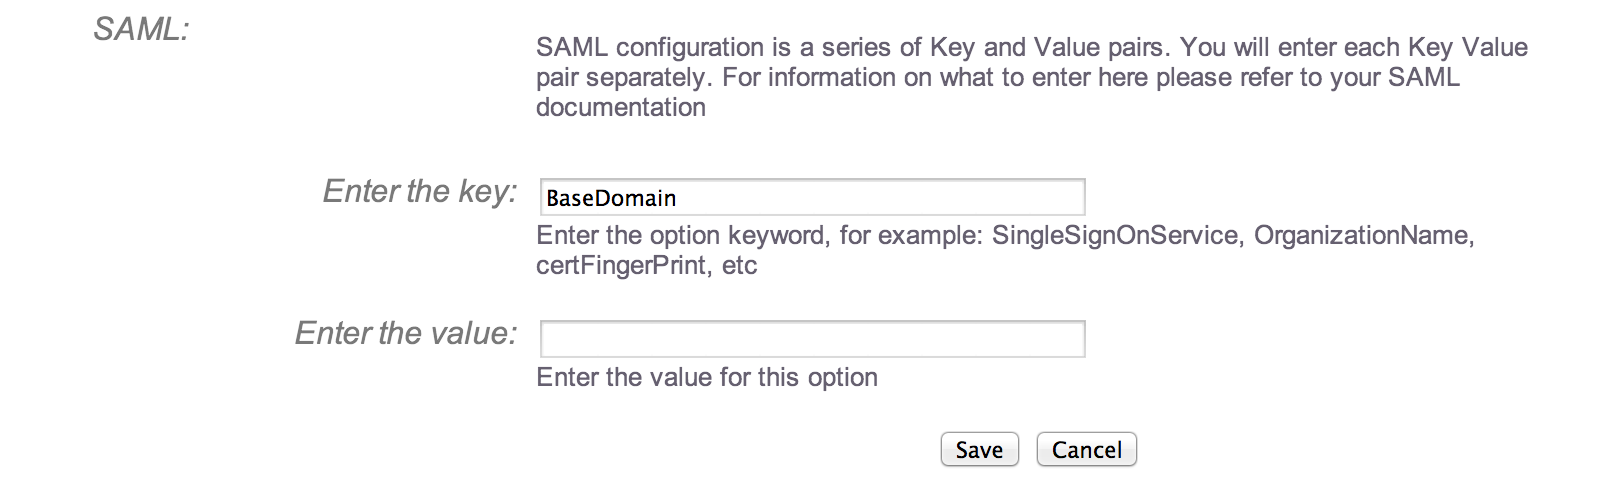
- Enter the BaseDomain value as supplied from the IDP (this is one of those supplied values) and click the ‘Save’ button:

- Click the ‘Add another setting’ button to add each additional required and option values as supplied by your IDP. When you are finished it might look something like our sample:

If you have a certificate file instead of a ‘certFingerprint’ then you will use the ‘Upload a certificate’ button instead of adding this value.
NOTE: The image contains ‘certFingerPrint’ this should be ‘certFingerprint’
NOTE: On ADFS you must use the certFingerprint (the certificate ADFS gives you is wrapped in an extra layer of encoding not valid at the service provider end)
NOTE: On ADFS copying and pasting the fingerprint data isn’t simple – there is a hidden character at the beginning of the fingerprint that won’t appear in notepad. Try pasting the fingerprint into a ‘DOS command prompt’, the first character will likely appear as a ‘?’ – in this case copy the fingerprint now displayed without the ‘?’. Paste this directly into the field when adding the ‘certFingerprint’ entry. Now remove all of the spaces and save.
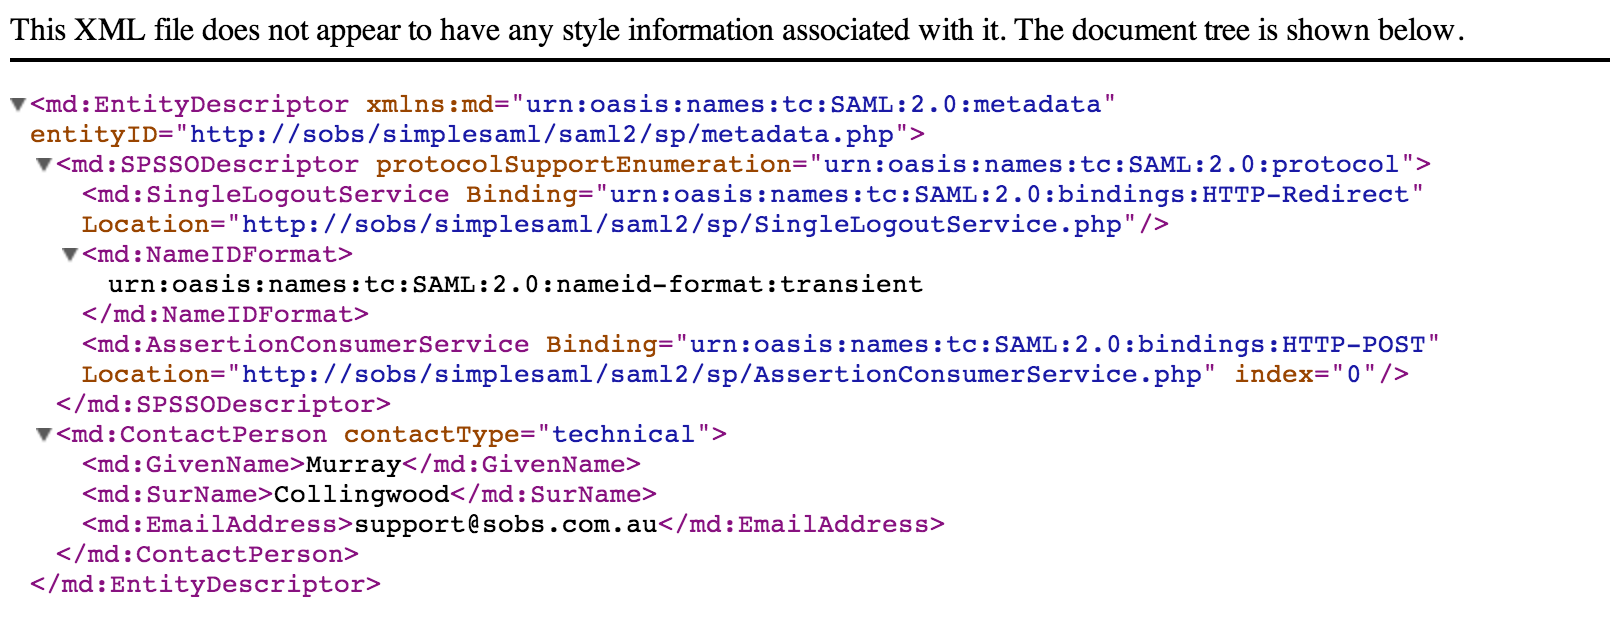
NOTE: On ADFS use the thumbprint from the Token Signing certificate. - You can use the ‘Generate metadata for IDP’ button to generate an XML document to supply back to your IDP – this completed the authentication circle (so the IDP will know you are who you say you are):
- If you are using the SAML services of StudentNet then they will automatically be populating a number of SAML attributes that they pass to us, such as the authenticated username, staff first and last name, email address and security level. If you are using another SAML provider or undertaking your own, then you will need to configure the attributes to be returned. By default we will use:
- The authenticated login name: User-Name
- The email address: mail
- First name: givenName
- Surname: surname
- An acronym or shortened name: shortname
- The security role: {faculty, staff, employee, teacher, student, alum, affiliate}
- DO NOT logoff just yet! If you were to logoff now and the settings were incorrect you and all staff will be immediately locked out of Sobs.
- Go to the ‘Staff’ list
- You might like to create a special ‘admin’ login (if you don’t already have one). It should not be one of your network logins – it will be your back-door to Sobs administration in the event there are problems with SAML now or in the future.
- On this ‘admin’ staff record you should be able to check a box called ‘non-LDAP’ (which is also used for ‘non-SAML’ as SAML is generally a frontend to an LDAP server)
- It is probably worth writing down the username and password into a secure location.
- You should also record the URL to use this login (normally login requests will automatically redirect to the iDP authentication page)
The URL will be: https://sobs.com.au/ui/login.php?schoolid=XXX&username=admin
Replace “XXX” with your school id number (you can find this in the School Settings page on the Authentication tab)
Replace “admin” with the username you are creating - Even with SAML enabled this URL will take you to the Sobs login page
- Finally you need a URL to login to Sobs (replace “XXX” with your Sobs school id)
https://sobs.com.au/ui/login.php?schoolid=XXX - When a SAML session is completed and the user logs off, and that logoff happens from Sobs, you can configure a URL that the user will be redirected to.
Go back to the School Settings page and the Authentication tab
Add another Key/Value pair to the SAML configuration
The key is “LogoffUrl”
The value is the URL that the user will be redirected to at logoff