Oct 7, 2018
Single Sign On (or SSO) is a fantastic option if you have the time and energy to implement it. SSO allows your staff member to log in once and then access all your school based and web based applications without being prompted to login again.
Configuration
Firstly it is important to understand the configuration process for SSO. This is a quick overview, the detailed instructions follow below.
- We require an iDP (identity provider), this will provide the authentication of the staff member. This could be ADFS, Azure, OneLogin, SchoolNet, or one of many other authentication platforms.
- We also require an SP (Service Provider), in this instance it is the SOBS application.
- You can begin by creating the SP entry in your iDP. Don’t try and setup everything, just an initial entry because later we will load some specific details via an XML file generated by SOBS.
- You will then login into SOBS and turn on SAML authentication and enter configuration entries provided by your iDP.
- Lastly you will “Generate metadata” from SOBS which will be loaded into your iDP to complete the configuration.
- Then you can test logging into SOBS using SAML.
IMPORTANT: When enabling SAML authentication in SOBS, be sure to configure your non-SAML login as the first step. This will ensure you can still login to SOBS and avoid the SAML process.
IMPORTANT: If you are configuring SAML with your own ADFS server, then download this PDF with instructions from our friends at Brigidine College – St Ives. Click to download
IMPORTANT: If you are configuring SAML with Office 365, then download this PDF with instructions from our friends at St Columba College. Click to download
IMPORTANT: The SAML interface relies on the URL https://sobs.com.au Do not use https://www.sobs.com.au
IMPORTANT: When using ADFS be sure to set SHA256
IMPORTANT: Set Assertion Encryption to false
IMPORTANT: We have two methods of implementing a SAML connection. 1. SHARED SAML: If you are part of group of schools who are implementing a single SAML based authentication service then the SAML settings will be shared between you and several other schools. We will need to talk to your ‘shared’ IT department in regard to configuring this shared SAML setup, and allocate them an account from which they will be able to manage the shared SAML configuration. 2. SINGLE SCHOOL SAML: Your school has their own SAML based authentication service, it is not shared by any other schools, then the instructions below should be sufficient. Do call if you would like to discuss this.
Let’s get started:
- Start by logging into SOBS and click on the school name at the bottom left of the screen
- Click the ‘School configuration’ entry
- Now click the ‘Authentication’ menu entry
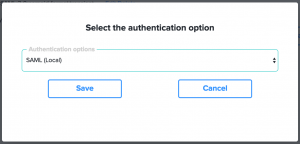
- Your current authentication option is displayed, click the ‘Select’ button at the top of the page
- If you school has a single SAML authentication service not shared with other schools then select “SAML (Local)”. If you are accessing a shared SAML service (for example, you are a catholic school and your shared IT department provides a SAML service to all of the catholic schools in your diocese)
As soon as this SAML option is enabled, all login requests to SOBS will be directed to your iDP to process authentication (login). As such you won’t see the SOBS login page ever again. However, at this point it won’t work as there is some more configuration required. - With SAML enabled the first step is to create ourselves a back door, a login process that avoids using the SAML process.
- Click on your school name (bottom left) and then on ‘Staff / Guests’ – this will take you to the Staff list.
- You should create a special ‘admin’ login (if you don’t already have one). It should not be one of your network logins – it will be your back-door to SOBS administration in the event there are problems with SAML now or in the future (like when your certificate expires and needs to be replaced before you can login again)
- Add or Edit this ‘admin’ staff record, ensure it has SOBS Administrator security for all applications
- Locate the option for ‘non-SAML’ (or ‘non-LDAP’ – they are the same) and ensure this is checked. This will become the only account that can login without going through the SAML process. (You can configure multiple accounts with this non-SAML option if necessary)
- It is probably worth writing down the username and password into a secure location, or storing it safely with the your other documented passwords.
- You should also record the URL with this login documentation. With SAML enabled all login requests will automatically redirect to the iDP authentication page, however we don’t want that to happen, so you will need to use this URL to avoid SAML:
https://sobs.com.au/ui/login.php?schoolid=XXX&username=admin
Replace “XXX” with your school id number (you can find this in the ‘School configuration’ page on the ‘Authentication’ menu entry)
Replace “admin” with the username you are creating - With SAML enabled and this username configured with “non-SAML”, this URL will take you to the normal SOBS login page where you can enter the password and login to perform SAML configuration maintenance
- We will now load some information from your iDP (your authentication service). We tested this with miniOrange, a web-based SSO service, and when we added an “SP” application a link to show the miniOrange “metadata” appeared. Clicking this link we were given a list of URLs, most of which would be required within SOBS.
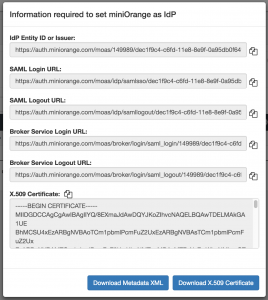
You will need values like these from your iDP to enter into SOBS SAML configuration. - Use the “Add” link to add SAML entries provided by your iDP
- The first entry you add will be your ‘BaseDomain’, this is normally the first URL provided. In our miniOrange example it was called the “IdP Entity ID or Issuer”
- You will also add the SAML Login URL, the SAML Logout URL
- There will be a button on this SOBS page to upload the ‘X.509 Certificate’
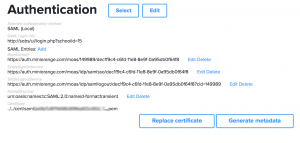
- My miniOrange settings in SOBS looks like this
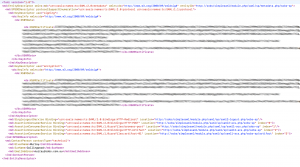
- You can now use the ‘Generate metadata’ button to generate an XML document to supply back to your iDP. The metadata will download as a file called “sobs-sp”, however it is an XML file, you may need to rename this file to “sobs-sp.xml” in order to upload it to your iDP. And this assumes your iDP has an option for importing metadata via an XML file. This completes the authentication circle (so the iDP will have these SOBS settings). Here is an example of the metadata:
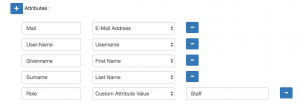
- The above is sufficient for authenticating the user, however in SOBS we also need some users details. SAML calls these details “user attributes”. ADFS calls them ‘Claim rules’. Essentially you are matching up some field names with values from the iDP staff record. You will configure these in your iDP. Here is a list of the attributes that SOBS will use (be sure to use the exact name, eg “User-Name” when adding these to your iDP):
- User-Name : the authenticated login name. (With ADFS/Azure this should be sent as user.onpremisessamaccountname or similar)
- Mail : the user’s email address
- Givenname : user’s first name
- Surname : user’s surname
- Shortname : an acronym or shortened name identifying this user
- Role : if role is one of these {faculty, staff, employee, teacher} then we will automatically set the user’s security to ‘Staff’. If role has any other value the authenticated user will be given a security of ‘Guest’.
- I configured miniOrange to send these attributes:
- Finally you need a URL to login to Sobs (replace “XXX” with your Sobs school id). This is listed on the ‘Authentication’ page.
https://sobs.com.au/ui/login.php?schoolid=XXX
If you are using “SAML (shared)” the URL is slightly different (but it is still listed on the ‘Authentication’ page.
https://sobs.com.au/loginsaml.php?samlidentity=YYY (where YYY is replaced by the shared SAML identifier – we would supply this) - There some other optional configurations:
- When a SAML session is completed and the user logs off, and that logoff happens from SOBS, you can add a URL for the user to be redirected to.
Go back to the SAML configuration entries (‘School configuration’ page and the ‘Authentication’ menu entry)
Add another Key/Value pair to the SAML entries
The key is “LogoffUrl”
The value is the URL that the user will be redirected to at logoff
- When a SAML session is completed and the user logs off, and that logoff happens from SOBS, you can add a URL for the user to be redirected to.